
|
|||
|
Jeep FAQ How-To Articles Quick Reference Product Reviews My Buildup Random Home |
So recently my PUMA air compressor decided to just stop building any pressure. One day it worked fine, the next day it didn't. It would build sometimes 25 PSI or so, but that was it. After doing some quick leak checks, it was obvious the compressor had to be taken apart. Lots of people run these compressors without trouble, but I've come across a couple of other people who have had similar problems. After taking the compressor apart, I believe it's safe to say I've found what is the most likely failure point. Luckily it's a pretty easy fix. Before you tear anything apart though, check the easy stuff. Listen for any possible leaks, maybe even spray some soapy water onto all the fittings to make sure it's not just leaking somewhere. There is always a check valve on all compressors to keep the air in the tank from coming back out, the check valve is marked in the picture below. Many times a stuck check valve can be jarred free with a light tap from a hammer. If that doesn't change anything, release any air that maybe in the tank. Then remove the nut that the arrow is pointing at in the picture below. Behind the nut is just a little rubber plug, and a light weight spring. This spring may want to come flying out when you remove the nut, it's not strong, but it might be hard to find if you lose it. Make sure there is no corrosion built up in the check valve, or on the rubber, if there is clean it out, and apply some air tool oil to it reinstall. Keep in mind these are brass fittings, they don't need to be super tight. 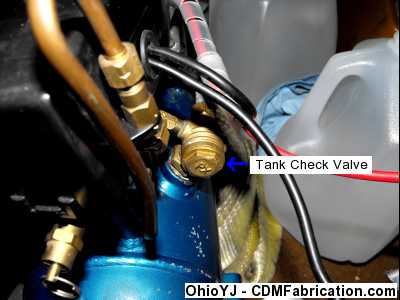
If everything so far checks out, no leaks in any of the lines, and the check valve is free, time for the serious stuff. Removing the "cylinder head" of the PUMA compressor is easy, four allen head bolts hold it on. Gently remove the "head", to ensure you don't damage the gaskets. I had copper material ready incase I had to make new gaskets, but it turned out the factory paper ones where fine, and re-usable. After seeing the factory paper ones, the copper wouldn't have been necessary, you could cut out a paper gasket out of gasket material available at any auto parts store. 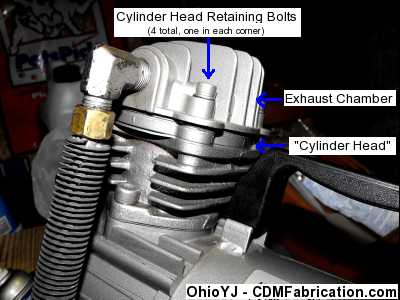
In this picture you can see the piston, and the thick, I assume, teflon sleeve around it. The sleeve is actually attached the piston, not part of the cylinder walls. It's not very likely that you would actually hurt this or wear it out, at least not anytime soon. Just like an engine block, the cylinder wall should be smooth, with a light cross hatch. 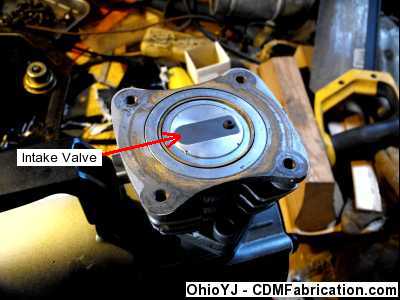
The PUMA works like a 2-stroke motor, the "valves" are essentially small flaps. Notice the intake valve on the piston itself. When the piston travels downward the valve is "blown" open by air as the piston comes down (the air enters in from below the piston). On the up stroke the air is blown out the exhaust valve as the intake valve is being held shut by the air now in the chamber on the up stroke. Because of the way the exhaust chamber is made you'll notice the plug on the opposite side of the exhaust chamber is not another exhaust side. It might be able to be retrofitted into an intake, but if you want to move the exhaust line you must actually rotate the cylinder head itself, I just rotated both the cylinder head and exhaust chamber together as one. Note I only did this because of some clearance issues with my roll cage. When I took the "head" off it was quite clear what the problem was, the exhaust valve was broken. The broken piece is the top piece, near the bottom of the picture. The other piece that looks similar is the first one we made as a replacement, that was obviously too short. I had to give the head time to soak in PB Blaster, as the small allen head bolt that holds it in place was extremely rusted/corroded. I didn't even try an allen head to remove it, went straight for the vice grips. Do everything you can to try and prevent the bolt from breaking, but let's face it, it's a steel bolt in an aluminum housing, it might happen. If it does, it's aluminum, it's easily heli-coiled, or tapped to a slightly larger size. Note that you can NOT use just a bolt and nut through the entire thing, it won't clear the piston, you must tap it to a different size, or heli-coil it if the bolt breaks. 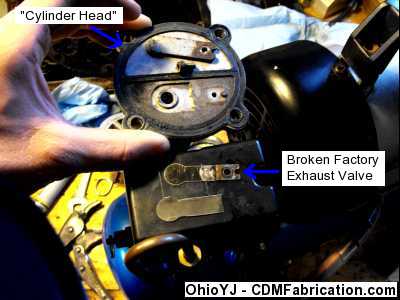
Once I had both pieces of the broken valve out, we marked out the valve on a similarly sized piece of stainless steel, and cut it out. We cut it out using a combination of tin snipes and a dremel. Once it was cut, holes drilled, and flat, we began the process of heating it and cooling it in oil. This will make it harder, and essentially turn it into a spring, like the factory valve. Now this is thin material, so heating it only required a MAPP gas torch. We simply heated it until it was glowing then cooled it in oil. This process was repeated it, until it felt similar to the broken valve (how high tech is that?). Now if it happened once, it will happen again eventually. Since I was making one of them, I went ahead and marked out a second, and cut out a backup, just in case. The first one lasted a long time, but it's easier to make two now. Below is an image of the new exhaust valve in place. I also tapped both pieces of the original to a note card and place it in my files, just in case. 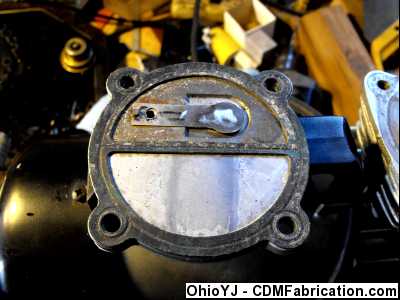
The metal plate that goes on top of the exhaust valve is just a limiter to keep the exhaust valve from being blown permanently open. 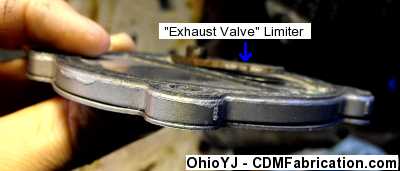
Now make sure you clean all the pieces before you reinstall them, especially if you used PB Blaster to soak anything. Brake Parts Cleaner works perfect for this. Also remember when reinstalling the cylinder head bolts, the bolts don't need to be super tight, you don't want to strip anything. Now if you didn't relocate the exhaust line, just re-attach the factory exhaust line that runs to the tank. As mentioned above I needed to relocate the line to solve some clearance issues. Originally I went and bought some 3/8 copper line and bent it up to route it around the compressor and back underneath the motor, except after several tries to get the bends right, I gave up and just bent it however I needed to take up the slack. While it worked, it was ugly. 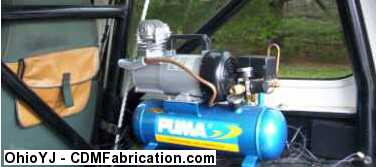
This time I didn't have the copper line handy, but I did have some 3/8 metal fuel line which is also the correct size. Note that 3/8 copper line is available in the plumbing section of hardware stores, 3/8 steel line is available at auto parts stores. To ensure I actually got the bends right the first time, I used a welding rod and bent it to the correct shape, then I bent the metal line to the same shape. Now in this application a single flare will work just fine. Even with a single flare though, 3/8 metal line is pretty tough, it's helpful to anneal it first. Just heat the end of it up until it glows, then let it cool naturally. You don't need to let it cool entirely, you can do the flare at anytime, just keep in mind it will be hot. I was much happier with this routing, much cleaner, looks like it came that way. 
If you are wondering what the metal sleeve is around the tubing, it's just a "heat sink" to help cool the air before it enters the tank. So out of nowhere my PUMA started blowing fuses (60 amp), eventually melted a 40 amp relay that has been powering it for the last three years (resulting in a small electrical fire). After replacing the wiring, and installed a 70 amp continuous duty relay, I moved to 70 amp fuse. Then 80 amp fuses, and after a handful of 80 amp fuses, it was clear I had another problem. With the fuses out of the equation, and the power being supplied without a fuse, just the relay, the motor would run, but it would bog way down for a moment, then come back on strong, right before it shut off (tank full). From the factory the PUMA has a large plastic box on it, that controls the on/off pressure, relieves the tank pressure when off, and controls the ground side of the power. I noticed with the cover off, and the compressor running, the "reed" valve that makes contact to complete the ground circuit was bouncing around like crazy, looked neat, lots of arcing. 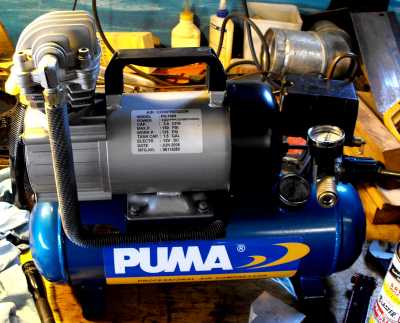
So I took the factory pressure switch off the tank, plugged up the tank, hooked the motor straight to a battery and let it pump until it reached 150 PSI, except this time, no hiccups, ran strong the entire time. After much searching locally, I could find all sorts of pressure switches for 120 volt - up compressors, but nothing that would handle the sort of load the PUMA draws. On eBay I cam across what looked exactly like the switch I had on the PUMA from the factory, prices ranging from $10-40 (buy it now prices), for the same box. Later I got to looking at the factory PUMA box, and it wasn't rated for the draw either, but it did work for quite a while. It was the same box I had found on eBay. Anyways, I ended up buying a small pressure switch that typically would have been used for an air-horn compressor, designed to turn on at 90 PSI, and turn off at 110 PSI, + or - 10% ($12 shipped). 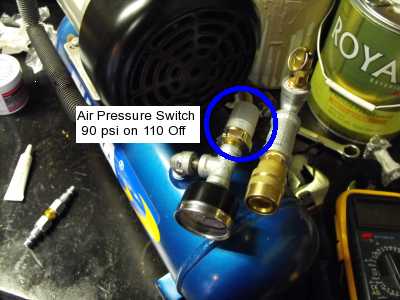
The new switch controls the hot side of my supply relay to the PUMA. The ground is now hooked straight to the ground (rather than being routed through the switch). With the addition of some plumbing fittings, I remounted one of the factory pressure gauges, and the safety pressure release (165 PSI pop off). I did not remount the regulator, it was just a restriction in air volume, and for my purposes it was completely unnecessary. This actually cleaned things up quite a bit. The gauge is angled for a reason, now if the needle is straight up I know the tank is full, and the gauge now faces the rear of the Jeep so I can see it at a glance. 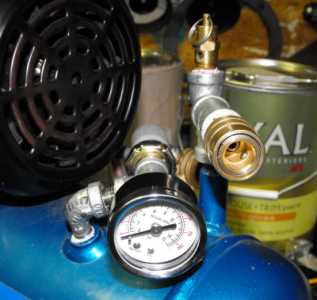
I did have one other problem after putting everything together again, the tank check valve was sticking. There was apparently enough corrosion on the inside to keep the rubber plunger from moving. For this I used some mother on a rag stuff firmly into the housing, stuck a socket on the impact and pulled the trigger to spin the housing (don't do this for very long!). The result was a very polished fitting, a little air tool oil on the rubber plunger and everything was good to go again. 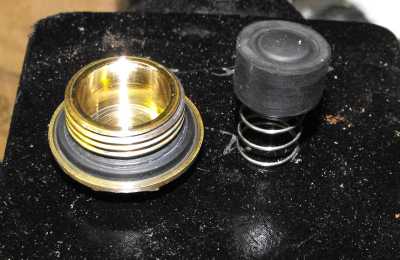
The compressor mounted back in Jeep (there's a lot of stuff in the back of the Jeep right now, don't mind the engine stand in the picture). The + or - 10% turned out to be plus 10%, notice the needle slightly past vertical, 90 PSI is the turn on pressure, ~122 PSI ended up being the turn off pressure. 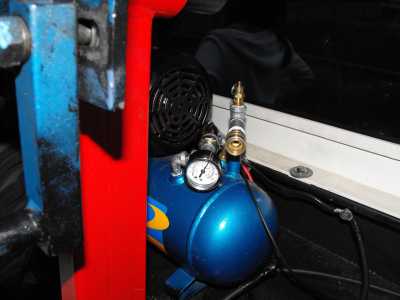
I still can't run the type of fuses I was running so something is still not quite right, so right now it's just the relay back there, but it does work very well right now. I'm hesitant to think its the electric motor since it still runs strong. At the moment, I'm just happy it works again. So I can control my PUMA remotely, I have it wired to a relay. Below is how I have it wired: 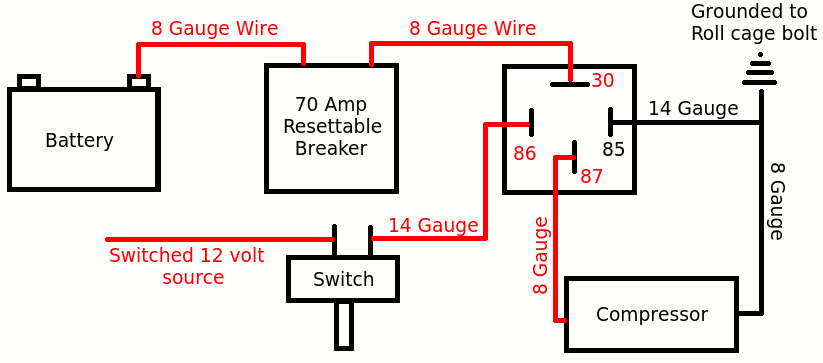
© Copyright 2006 - 2025 Mike Lee
|
|
|