
|
|||
|
Jeep FAQ How-To Articles Quick Reference Product Reviews My Buildup Random Home |
So I decided to finally change out my homemade air intake for something else. My time to fabricate is pretty limited these days, so I just thought I would order a kit. Found a Rugged Ridge cold air intake shipped to my door $200, deal right... ? So it was packaged well, arrived safely, with all the bits and pieces. Unpacked everything, and inspected things. First thing I can say is get out a file, and clean out all the nasty bits out of the aluminum intake tube they included. Not sure about your motor, but mine doesn't like metal shavings. 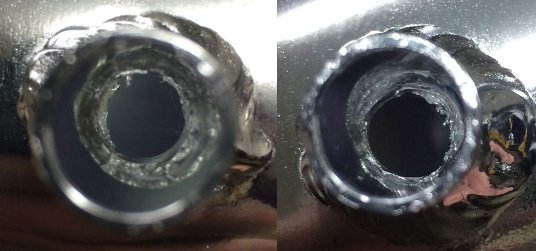
So after running a round file through the holes and some sand paper on the inside to remove all the burrs, I started the installation. First thing, just throw the instructions they send away. They are absolutely worthless. First the pictures are way too dark to see anything. If you download the PDF from their web site the pictures are still black and white, but not as dark. Just as an FYI, don't try and enter your Jeep information, as it will say no products available, you have to go through the categories to get to the correct place. The second step mentions mounting the "heat shield" with 1/4-20 bolts. At this point I am starting to realize this is not going to be fun, all the bolts included with the kit are metric. On top of that they are garbage. They did include nylon lock nuts, but be very careful not to over tighten the bolts. They will strip if you look at them wrong. The instructions forget to mention assembling the two pieces of the heat shield before bolting this in. However you will also quickly that if you install the bolts in the lower part of the shield they will not clear the air filter mount on the fender. So you will need to mark the holes, and drill holes through the tray. You can then bolt all the way through, or just drill holes large enough that the bolts can pass through. So next install the edge trim. Some images of the kits show this as something that looks like it would seal up against the hood (like the instruction's final step). However this "edge trim" really serves no purpose at all, and is nothing like some pictures I found of the kit. Install it if you want, or throw it in the trash. Here in this image my hand is at the edge of the fender, the hood would be even farther, as you can see this part is not meant to seal or touch the hood in anyway. 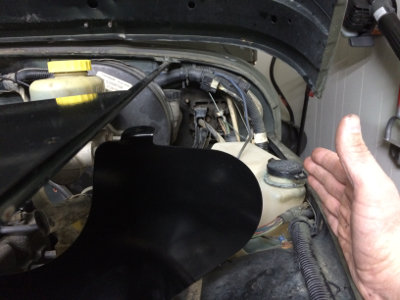
So this problem, I will admit is 100% my fault, as I'm not running a YJ intake or power steering setup. The kit does not clear 4.0 with the WJ intake. It's ok though as you will be bending things all over to make this work, so the problem is easily solved. 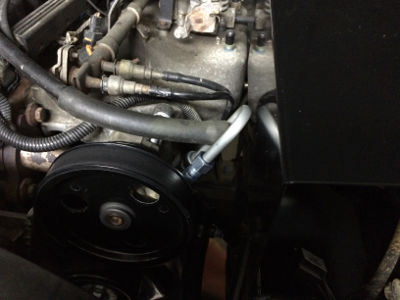
This was an interesting one, the intake boot is quite a bit larger than the throttle body. "Throwing a hotdog down a hallway" applies here. I'm not using a YJ throttle body, however I grabbed a YJ throttle body off the shelf and took measurements and it was even worse of a fit. 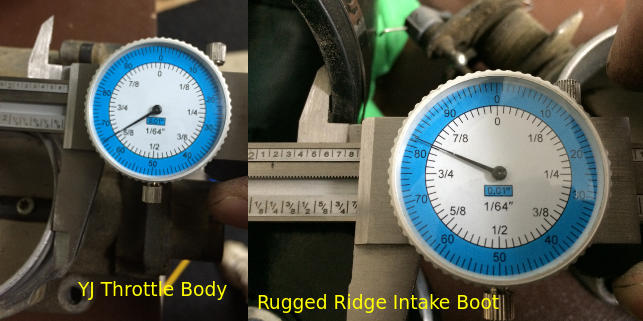
You will most likely find that you need to tweak the heat shield in several places. I found I had to change several of the bends on the heat shield by a fair amount. On top of this I had to drill new holes in it to attach to the grille supports. I had to gain clearance for the power steering pump due to the WJ intake, so on a stock YJ motor you probably won't need to modify it as much ("as much" being key words). Also the zip-ties they include, just throw those away. All 4 they sent in my kit were defective. 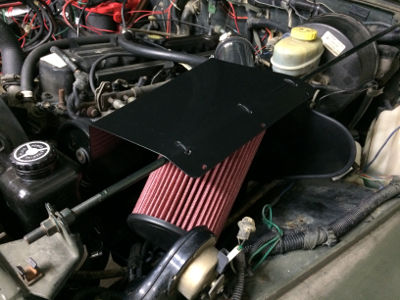
Once you are ready to do the final install, you will notice the mount for the intake tube is not long enough, and the rubber bolt mount does not have enough travel. In fact then you will also notice the intake tube ends up just sort of where it should be. I couldn't leave the intake tube bracket the way it was. I decided to pull the heat shield out and make it "right". All it needed was for the slot to be longer by about an inch. I also had the realization that this one may not have been entirely RuggedRidge's fault, as this problem is most likely created by my MML. 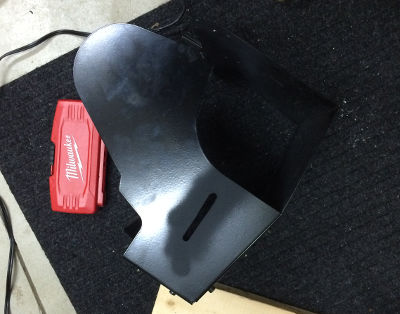
Still a MML is a reasonably common modification, it would have been nice to see this accounted for in the kit, since the fix is so simple. Also that picture is before I painted it gloss black so it would match, so ignore the flat primer (it makes the slot show up better in pictures). The air filter and intake tube have the opposite problem of the throttle body and boot. It will take some serious work (force) to get the filter to go on. After you do get it on, then I would remove the tube and make sure you didn't cut any small pieces of rubber off of the filter. All these small pieces need to be removed so they aren't sucked into the motor. You'll find the air filter, still touches lots of things. I had to modify the horn bracket, and the filter still touches the horn. So the last step is important, take that logo they included and throw it in the trash can. If I have to completely re-work your product, your logo no longer belongs anywhere near it. 
Since this has the "hot dog down a hallway fit" I would make sure you double check for leaks after completing the install. This is one of those times, I wish I would have spent the extra $50-60 and picked up another brand kit. Was anything I did hard? No. If you have a Jeep odds are you are very used to making things work, so this kit should be no different. Just don't expect it to just install, as you will be modifying things. Had I paid the MSRP of $270, I would have been even more disappointed. I would not recommend this kit.
© Copyright 2006 - 2025 Mike Lee
|
|
|