
|
|||
|
Jeep FAQ How-To Articles Quick Reference Product Reviews My Buildup Random Home |
Ok, my writeup is going to be rather generic, and from memory, so its more of an outline. There is nothing complex about rear axle work, its quite simple, its just a matter of taking your time, and double checking your measurements. If you don't do it right, you'll be tearing into it again, just like anything else you do. The good thing about pinion bearings is there is no actual gear setup required, the only thing you have to worry about is pinion bearing preload, to much and you'll destroy bearings, to little and your destroy bearings (Unless your way far on one side of the spectrum, you won't destroy them, just accelerate the wear on them). After blocking the wheels, so the vehicle can't move, remove the driveshaft. This is the easiest time to break the pinion nut loose, it can be a bear, so have a big breaker bar and a long piece of pipe ready. Get the vehicle up on jack stands, and the tires removed. 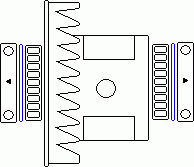 1. First pull the diff cover. 2. Next the axle shafts have to be removed, pull the rotors or drums off. If you have C-clip axles remove the center pin from the carrier (The round thing in the center of the picture below). If don't have a C-clip axle, remove the flange bolts. Remove axleshafts, both sides. 3. The carrier can now be removed. Note that in the picture there are arrows on the caps, most caps will have some sort of identifier (normally an arrow) on them, make sure you remember which way the "arrow" points. You want to re-install the cap the exact way it came off. 4. Shims. The blue thing in the picture above represents a shim. There are shims on the carrier to set the backlash. Think of backlash as the amount of play between the ring gear and pinion gear teeth. The shims can be on the outside of the bearing or underneath the bearing. If they are like the picture, pull the carrier out carefully keeping the shims together with the carrier. You just want to make sure the shims that went on the left stay on the left, and the ones on the right stay on the right. Most axles actually have the shims underneath the bearings, meaning you can't mess them up, and can just pull the carrier without worries. So the carriers out, time to pull the pinion. 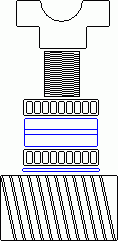 5. Finish removing the pinion nut, you did loosen it before you started, right? 6. Pull the yoke off. 7. Push the pinion gear out, sometimes you may have to give it a couple love taps with a hammer to persuade it to come out, careful though you don't want to knock it out onto the floor, as it can chip teeth and such fairly easy. 8. See the big blue thing in between the bearings? That will be different on different axles, sometimes its a stack of shims, sometimes if a solid spacer, sometimes its a crush sleeve. If it's a crush sleeve it must be replaced. If its shims or a spacer, just grab it and make sure you put it back just the way you found it. You'll most likely have to remove the pinion seal to get the outer bearing and spacer out. Just pry it out, this is as good of time as any to replace it. 9. The bearing closest to the pinion must be pulled and pressed on using a press. This is where I go to the closest auto repair shop around, and buy the guy lunch, offer him some cash, whatever he wants to press the bearing for me. Careful though when you have them pull the old bearing, see the blue ring in between the bearing and pinion, thats a shim or shims, that sets pinion depth. Pinion depth determines where the pinion gear rides on the ring gear. You have to make sure those shims are all there before you press the new bearing on. 10. As for the races, unless they really look bad I leave them. 11. Slide the pinion back in with the new inner bearing pressed on, then slide the spacer or new crush sleeve in. Place the outer bearing in, then install the seal. Replace the yoke, and start the pinion nut. 12. This is where you have to take your time. If you have a spacer or shims in there, tighten the pinion nut down till it seats on the yoke, but not to tight. You will need an inch pound wrench, to measure the drag on the pinion. The pinion should not spin freely in there, it should have a specified amount of drag on it. The torque to achieve the proper amount of drag could be anywhere from 90 ft-lbs, to 300 ft-lbs. If you have a crush sleeve expect to do some serious tugging as it takes quite a bit to get those things to crush at first. You have to check the preload on the pinion bearings using the inch-pound wrench without the carrier in, so I normally use a big monkey wrench and pipe to hold the pinion yoke still while cranking on it. 13. Once you have the pinion bearing preload set, just reinstall everything, and you're all done. Remember the caps that came off the carrier, those also have a specific torque recommendation, which varies from axle to axle. So to do this properly, you will need a torque wrench, both foot-pounds and inch-pounds. You can rent these from tool places, and some AutoParts stores even rent them for free. You will also have to run to a shop once to have the inner bearing pressed. Other than that, its mainly basic hand tools. Can you do this? Depends on your mechanical ability, if you do most of your own work, then yeah you should be able to do it, if you pay someone to change your brakes and oil, you probably shouldn't attempt it.
© Copyright 2006 - 2025 Mike Lee
|
|
|